Git from Beginner to Advanced
Getting comfortable with Git took me a long time. I thought I'd write a quick guide that assumes no prior knowledge, along with some of my favourite tips and tricks.
Terminology permalink
If you're familiar with basic Git terminology you might want to skip ahead.
It took me a long time to get comfortable with Git. Perhaps because some of the terminology is a little strange but also, I think there is an assumption that everyone around you just gets it. They probably don't. The best developers I know still struggle with Git sometimes.
I thought I'd take the time to cover:
- key terminology,
- installation and set-up,
- get started and
- tips and tricks that make working with Git easier.
What is Git? permalink
Git is a version control system. It's one of many, but it's the most widely used by web developers. Version control helps manage changes to code. It's great for individual projects but becomes practically essential when working in teams.
There are a few terms you will need to learn before you use Git:
Repositories permalink
A repository represents the entire project. All of the project code along with any changes are stored in a repository. Your local copy of the repository doesn't necessarily contain every change. It may in-fact be missing large portions of code that are stored in other repositories. For example two developers working independently can each have changes in their local repository that the other is not aware of.
To share changes we can push code to a remote repository and pull to get updates. By regularly synchronising with a centralised repository multiple developers can share work and manage changes.
Git does not require a centralised remote repository, although this is the most common way of working with Git. Services like GitHub provide hosting for repositories as well as tools to help us review code and manage changes via pull requests.
The initial step of copying an existing repository to your local file system is called cloning.
Branches permalink
Git allows individuals to have their own copy of the code, or even multiple copies at the same time, each stored on a different branch. A branch typically contains a new feature or a significant change.
You can checkout a branch at any time to work on it. This will update all the files in your local repository to reflect the selected branch.
Git is clever and it only stores changes we make from the time we create a new branch. It remembers the base, (the point where the branch was forked) and saves the minimal amount of information required to represent that change. The ability to store only the differences from the previous version is central to Git.
Branches are intended to eventually be merged back into the trunk. The trunk is just the main branch and it's typically called 'master'. You normally branch off master, but if you have a good reason, you can create a branch off any other branch.
Commits permalink
A branch is made up of one or more sets of changes to files. We call these commits. If a branch represents a feature, a commit represents an implementation step. Each commit has an associated message and ideally this message should describe the step taken and perhaps more importantly why. Selecting files to be added to a commit is called staging.
A good series of commit messages should read like steps in a recipe or a set of instructions. For example the commit messages for adding timestamps to posts on my Writing page, might look something like this:
- Write tests for
formatDatefunction - Create
formatDatefunction - Add timestamps to articles using html
timeelement - Add CSS to style timestamps
Truthful Disclaimer: On my personal blog, they usually do not look like this.
That covers the main terminology, and if you can understand repositories, branches, commits as well as follow some of the other terms I've introduced here, then you are on your way to mastering Git.
Install and set-up Git permalink
If you're new to Git one of the first things you need to decide is whether you'd prefer to use a graphical application or type commands in the terminal. There's no right answer here. I know plenty of skilled developers who prefer graphical applications as well as plenty of weekend hackers who get by just fine learning a few commands. Whatever you decide to use is fine.
Personally, I use a combination of the command line and graphical tools within VSCode.
Command line permalink
To install Git in the terminal first check, because you may already have it. Type git --version. Instructions here will assume you're running version 2 or later. If you don't have Git installed:
Mac:
brew install git
Ubuntu:
sudo apt-get install git
Windows:
In my experience the Windows version of Git is significantly slower. If you want to use a Git terminal in Windows, I strongly recommend setting up WSL and Ubuntu. To get started, download and install Ubuntu from the Windows Store. Once you have a Ubuntu terminal running in Windows you can follow instructions for Linux\Ubuntu.
If you absolutely must, you can download Git for Windows.
Graphical applications permalink
VSCode
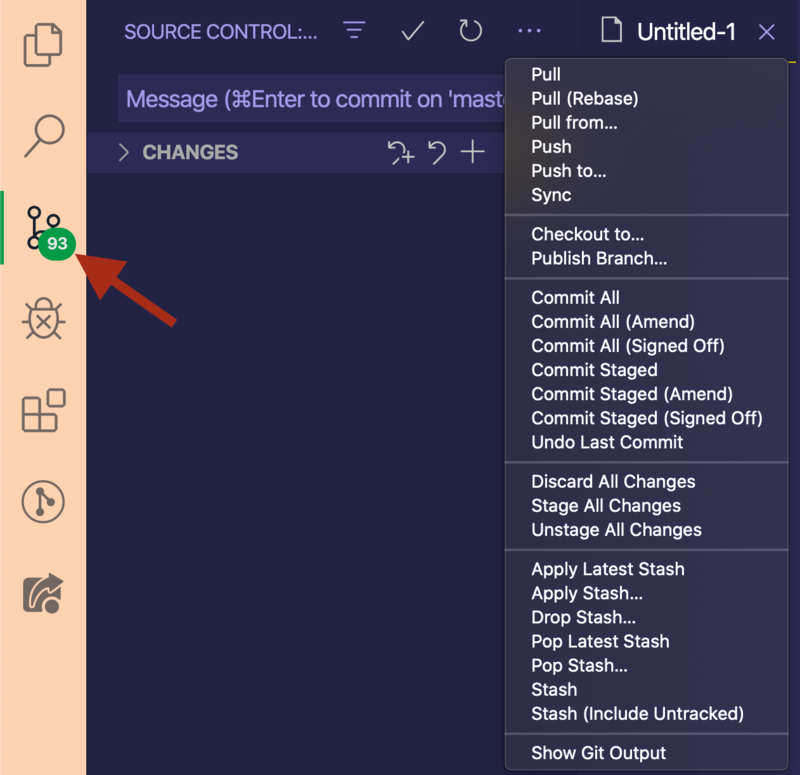
If you use VSCode there are a number of built in tools in the source control pane. These allow you to diff files, stage changes, manage merge conflicts and even push, pull and execute more advanced commands without leaving the editor. I find the source control pane practically essential for dealing with merge conflicts. If you are after a simple GUI, this might be all you need.
The source control pane makes use of a git terminal in the background Follow instructions above for installing a command line version of Git before running VSCode.
Note: At the time of writing VSCode source control pane will not work with WSL Git.
Plugins
On top of the built-in tools, the only plugin I recommend is GitLens. It adds a lot of features, but the one I enjoy most is, it un-obtrusively adds information to the text editor that shows when each line of code was changed and what the commit message was. This contextual information is brilliant when working on larger projects.
Other Git applications
There are a bunch of free and commercial Git clients. Free includes GitHub Desktop as well as Sourcetree. On the commercial side I have friends that use Git Tower and GitKraken they both look good, but haven't used either of them.
Configuring Git permalink
Identity permalink
After you install Git it's a good idea to add your user name and email address. This is important because every Git commit uses this information. To configure these in the terminal type:
git config --global user.name "Mike Riethmuller"
git config --global user.email mike@madebymike.com.au
You can use your own name and email rather than mine. And you can change these settings for specific projects by removing the --global flag.
Note: If you don't want to share your email publicly, GitHub provides options to set up a private email address. Go to https://github.com/settings/emails and Select "Keep my email address private". Then follow the instructions.
Credentials permalink
If you are making a lot of changes and regularly pushing these to a remote repository, you will be prompted to enter a username and password. To avoid entering this every time you can use a git credential manager.
To store credentials indefinitely on your hard drive:
git config credential.helper storeTo store credentials in memory for a short period of time:
git config credential.helper cacheHopefully I don't need to say it, but you should consider security before storing credentials.
There are a number of other ways you can authenticate with a remote repository including SSH keys and third-party credential managers. I'm not going to cover them here.
Aliases permalink
One of the first things I do on any new machine is set up a bunch of aliases for the commands I'll be using ever day: status, checkout, branch and commit. Aliases allow me to give a command an alternative name. I could not work without these.
git config --global alias.s status
git config --global alias.co checkout
git config --global alias.br branch
git config --global alias.ci commit
You can set up your own aliases, but I recommend these. I use git s religiously. For some reason, I don't use an alias for add or push. I think add is short and simple to type and I find it satisfying to pound the letters P-U-S-H as I demonstrate my victory over the code.
For even more aliases see the tips and tricks at the end of this article.
Getting started permalink
When working with an existing repository you need to clone it. Go to either GitHub, BitBucket, or some other hosted repository and copy the URL.
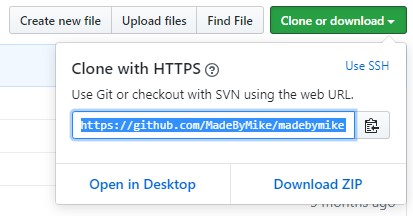
Cloning permalink
In the terminal, navigate to a directory, then type:
git clone https://github.com/MadeByMike/madebymike.madebymike.gitUse the URL for your project, not my blog, although feel free to clone it if you want.
This will create a new directory for the project. If you want to clone into a existing directory you can add this after the URL. For example, adding . after the URL will clone it into the current directory.
Once you have cloned your project it will be set-up to track the remote origin. This means when you push git, it knows where to send things.
Creating an empty Git repository permalink
You don't need to do this when you clone, but sometimes you will start new project that doesn't have an existing repository. Using GitHub you can initialise a new repository via the UI and then clone it. Make sure you check the "initialise this repository" option.
Once this is done you just clone the repository using the instructions above.
However, if you have existing work, you probably want to initialise the repository locally. You do this by typing:
git initIf using a graphical application look for an initialise repository option.
Adding a remote repository permalink
If you initialise a repository locally you probably want to add a remote origin sooner or later. The steps are a bit less intuitive.
First create a new remote repository. For example, if using GitHub, follow the instructions above but don't select the option to "initialise this repository". Once a remote repository has been created, you add the remote origin like this:
git remote add origin https://github.com/MadeByMike/madebymike.madebymike.gitNow your local knows where to push and pull from you can sync with the remote repository as long as you have the correct permissions.
Important commands permalink
By now you should have created a local repository using one of the methods above. The next step is to create a branch and add some commits.
Status permalink
You will want to check git status often (very often) to see what files are staged, unstaged, and how many commits ahead of origin your local branch is. That's why we created a short alias. Use:
git sOr git status without the alias.
Branch permalink
Before we start any work we should create a new branch. Working on master is not a good idea and almost any workplace will have processes that prevent this. Most work will be merged to master via a pull request. Working in branches is a good habit when working locally too.
To create a branch we can use the alias we set-up earlier.
git br name-of-branchOr git branch name-of-branch if you don't have the alias.
Checkout a branch permalink
After you create a branch don't forget to checkout before you start work.
Using our alias:
git co name-of-branchOr git checkout name-of-branch.
Staging files permalink
Once you've edited some files you will want to add them to a commit. You can be clever and surgical to make sure you only stage the files and folders you want, but in truth, about 90% of the time I want to stage everything. I usually type:
git add .If you want to stage specific files or folders you can add a path after add. For example git add ./my-folder/ will stage files in my-folder only. You might do this so that your commits are smaller and more meaningful. In my opinion, it's easier, and a better habit to just commit more often. I like to only edit files I intend to go into the next commit and try to think just one stage ahead. It's hard, but it's a good habit.
If you want to pluck individual files into different commits, the VSCode source control pane is how I usually do it. I find the visual editor better for these kind of tasks.
Unstaging files permalink
Sometimes I will stage files I didn't intend. To unstage we use the command:
git reset ./path-to/file.jsI also find the VSCode source control pane handy for this.
Commit permalink
Once staged, you add these files to a commit with the command:
git commit -m "Add a useful commit message here"If you don't add a the -m parameter it's typical to end up in Vim. You can add a message here but this can be intimidating for new users. BTW to exit Vim press Esc to exit edit mode, then type :q! and start again.
Unstaging a commit permalink
Sometimes I commit a set of changes before realising I've made a mistake or I commit files to the wrong branch. When this happens, the easiest way to fix it is to reset like this:
git reset HEAD~1This tells Git to reset everything back to the previous commit. By default it will keep all your changes and just unstage them. Use --hard after the command if you want to reset and wipe everything back to the previous state. But be careful!
Note: If you have pushed and reset a commit after this, your history will be different from the remote. Try to avoid it, but if you need to fix a mistake like this you can force push git push -f.
Push permalink
After each commit you want to push these to the remote repository. You do this with:
git pushMerge permalink
Once a branch is complete and ready to be merged you use the merge command. First checkout the branch to want to merge into (usually master). Then type:
git merge my-branchAnother way to merge changes is on the remote repository via pull requests. Pull requests can be reviewed by the team and merged to master on the remote. After this every one needs to pull to update their local copy of the master branch.
Pull permalink
When the remote repository ends up ahead your local copy you need to pull.
git pullThis will fetch the latest code for the branch you are on as well as an index of any branches other developers have pushed to remote. Now you can now checkout their branches too.
Managing merge conflicts permalink
Sometimes when you merge or pull you will end up with conflicts where 2 branches have modified the same files. If Git can't resolve this automatically it will ask you to resolve the conflict manually.
The terminal will tell you which files have conflicts:
> Auto-merging FILE-NAME.JS
> CONFLICT (content): Merge conflict in FILE-NAME.JS
> Automatic merge failed; fix conflicts and then commit the result
You resolve these in your editor and stage the files when the conflicts have been removed. This is where a VSCode or a GUI are especially useful for highlighting the differences and allowing you to select the desired change.
For larger merge conflicts use git status to see which files still need changes.
When all your files have no conflicts you can stage them as usual using git add and git commit to complete the merge.
There are not magic secrets for making merge conflicts easier. They can be terrible. Making smaller commits and syncing often helps avoid having them, which is the best strategy.
Tips and tricks permalink
You should now have a grasp of the basic commands and a developing understanding of how git works. This is enough to be effective with git. The next section focuses on some more advanced commands and tricks that might help make working with Git a little easier.
Stash permalink
Stash is good for when you want to quickly check out a different branch but are not ready to commit your current work. To quickly stash files, use the command:
git stashYou can now switch branches and work on something else and when you are ready to retrieve work from the stash run:
git stash popIf you are like me, git stash is sometimes where things go to die. You can use git stash list to remember what you put there. And you can even add a message to any stash with -m just like a commit.
You can then retrieve a specific stash with git stash apply stash@{1} where stash@{1} is the index from the list.
Checkout a file from another branch permalink
Sometimes you want to checkout a specific file from another branch. Usually master, and usually to fix a mess. You can do that:
git co master ./path-to-fileThis will replace the file on you current branch with what is on master.
You can also replace the branch with a commit hash from git log to checkout a particular revision.
Create and checkout a branch in one step permalink
Usually after creating a branch the first thing I do is to checkout and start working on it. I can do this in one step with the -b parameter.
git checkout -b name-of-branchWhen I started I never remembered this so I aliased it to "new": git config --global alias.new checkout -b
List all aliases permalink
Added a new alias but can't remember it yet?
git config --get-regexp aliasAdvanced tips permalink
This section has some even more advanced tips.
See which branches you've been working on recently permalink
git for-each-ref --count=10 --sort=-committerdate refs/heads/ --format="%(refname:short)"I have to admit, I learnt this one from Harry Roberts but I use it all the time. I've also aliased this to git recent and you should too. Read the rest of Harry's git tricks.
Delete merged branches permalink
On larger projects eventually you end up with a lot of local branches. If you automatically delete branches on remote after merging you can run:
git fetch --pruneThis will delete local branches that have been deleted on remote.
This next one is not so much a Git command as a bash command - sorry Window users (use WSL).
If your remote branches are not tidy or you just have a local mess, the following command will find all branches merged into the current branch, and delete them:
git branch --merged |
grep -v "\*" |
grep -v "master" >/tmp/merged &&
nano /tmp/merged &&
cat /tmp/merged |
xargs -n 1 git branch -d
It's a little long because it tries to be safe. It will always exclude master and allow you to edit the list of branches in nano first. Delete any you don't want removed.
Git actions are reversible permalink
I've always wielded Git with a healthy dose of fear and trepidation. It can be quite intimidating, but I've come to realise, it's actually hard to break anything with Git. Almost every change is reversible, but figuring out how is often the hard part.
Remember you can always reset. Good luck :).